Quickstart Walkthrough
The following explains the steps that happen automatically when the expressInstall function is executed.
The Local - No Docker, Local - With Docker,
Local - Docker Compose, and Host OpenZiti Anywhere quickstarts all run
the expressInstall function. Each version varies slightly. This page will focus on the
Local - No Docker quickstart.
The General Process
- Obtain the OpenZiti binary
- Create a PKI
- Create a Controller configuration
- Initialize the Controller
- Start the Controller
- Create a Router configuration
- Create a Router entity on the network (via the Controller)
- Enroll the Router previously created
- Add default edge router and Service edge router policies.
General Environment Setup
Obtain the OpenZiti Binary
The expressInstall function will call getZiti to obtain the Ziti binary. The getZiti function detects your
OS type and architecture to craft the specific download URL for the binary. The binary is downloaded, and extracted to
a directory within the network directory.
The quickstart script isn't limited to expressInstall. You can source the ziti-cli-function.sh file and run any of
the many helpful functions. For example, you can run getZiti to get the latest version of OpenZiti downloaded quickly
and easily.
Create a PKI
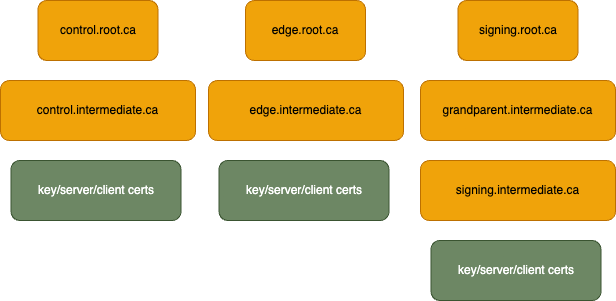
As part of the expressInstall a PKI is generated automatically. The PKI consists of a root CA, four intermediate
CAs; one for each of the controller's config sections (control, edge/API, identity) and an arbitrary CA. Additionally,
an extra intermediate CA is created on the signing cert chain to demonstrate that arbitrary cert chain lengths
are acceptable.
Once the CAs are generated, a key, server cert, and client cert are generated for each of the controller's config sections. The following image represents the overall PKI architecture.

Update the CA Bundle
The latest tunnelers require full and complete PKIs, not arbitrary trust anchors. Therefore, the root and intermediate CAs must be added to the CA bundle. Additionally, the file is copied for the Edge/API CA bundle.
cat "${ZITI_PKI}/my.root.ca/certs/my.root.ca.cert" > "${ZITI_PKI}/${ZITI_NETWORK}-network-components/cas.pem"
cat "${ZITI_PKI}/my.root.ca/certs/intermediate.from.external.ca.cert" >> "${ZITI_PKI}/${ZITI_NETWORK}-network-components/cas.pem"
cp "${ZITI_PKI}/${ZITI_NETWORK}-network-components/cas.pem" "${ZITI_PKI}/${ZITI_NETWORK}-edge/edge.cas.pem"
Controller Creation and Configuration
A controller configuration file is generated using the OpenZiti CLI binary. After the configuration is created, the controller is initialized. The process of initialization also initializes the database.
The controller is then started and the quickstart waits for the controller to finish starting up before continuing as the controller is necessary to create the edge router which happens in the next steps.
Default Policies
Two policies are generated to simplify the process of getting started with the network.
An Edge Router Policy
is created to allow all identities to connect to a router with a #public attribute. The router created during the
expressInstall is populated with this attribute.
A Service edge router policy
is also created, allowing all services to use routers with the #public attribute.
Router Creating and Configuration
Just as with the controller, a config file is generated for the router. The router also needs to be created through the controller. This will generate a one-time token (OTT) to be used during router enrollment.
The router is then enrolled using the router configuration along with the router's OTT.
Customization
The quickstart offers numerous environment variables for use in customizing your unique situation. Here is a list of the most commonly used environment variables and their descriptions.
By default, the quickstart PKI is set up with 127.0.0.1 as the default IP. The *_IP_OVERRIDE variables allow you
to add an IP the PKI will be valid for.
ZITI_CTRL_EDGE_IP_OVERRIDEan additional IP for the controller. This value is added to the PKI SANs IP field for the controller's edge PKI trust chain.ZITI_ROUTER_IP_OVERRIDEis a custom IP for the router.
Here are a few more common variables.
ZITI_CTRL_EDGE_ADVERTISED_ADDRESSis the valid name for the Controller address used in the PKI.ZITI_ROUTER_ADVERTISED_ADDRESSis the advertised address of the router. This defaults to the value inEXTERNAL_DNSif set. Otherwise, the value inEXTERNAL_IPis used.ZITI_CTRL_ADVERTISED_PORTis the port used for the Controller's control plane address.ZITI_CTRL_EDGE_ADVERTISED_PORTis the port used for the Controller's Edge/API plane address.ZITI_ROUTER_PORTis the port used for the Router's advertised address.
The following are PKI related customization variables
It is extremely important that quickstart has the relevant information to set up your PKI. This generation is only performed once so, if it is incorrect, the entire PKI needs to be regenerated.
It is highly recommended to use DNS over IP as this is a one time setup, if your IP changes, then your PKI is rendered useless.
export EXTERNAL_DNS="acme.example.com"
export EXTERNAL_IP="$(curl -s eth0.me)"
export ZITI_CTRL_EDGE_IP_OVERRIDE="${EXTERNAL_IP}"
export ZITI_ROUTER_IP_OVERRIDE="${EXTERNAL_IP}"
export ZITI_CTRL_EDGE_ADVERTISED_ADDRESS="${EXTERNAL_DNS:-${EXTERNAL_IP}}"
export ZITI_ROUTER_ADVERTISED_ADDRESS="${EXTERNAL_DNS:-${EXTERNAL_IP}}"
export ZITI_CTRL_ADVERTISED_PORT=8440
export ZITI_CTRL_EDGE_ADVERTISED_PORT=8441
export ZITI_ROUTER_PORT=8442